Delubrum Reginae Savage:
Savage Slimes Guide
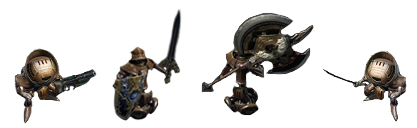
Click on the images to access the corresponding sections:

Slimes
Golems
Trinity Seeker

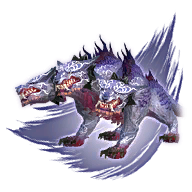
Dahu
Queen's Guards
Phantom
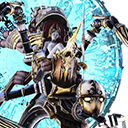
Trinity Avowed
Minotaur

The Queen

Duel

° Prerequisites and sign ups °


• REQUIRED:
- Specific actions & pure essences (← click me!)
- Resistance rank 15 & 700K mettle (for unlock only, quest: "A Seaside Story")
- Disciple of War or Magic (lvl 80+)
- Understanding basic English calls• OPTIONAL:
- Bozjan earring
- Rank 25 with 99 capacity in your holster
- Resistance honors stacks (rays)


• HOW TO SIGN UP?
- A notice will be posted in the channel #drs-announcements with a Google Form
- This form must be filled, then the Raid Leader will build the roster
- If you are in the roster, you will receive a (temporary) role as well as a ping to inform you. Keep an eye out for your discord notifications!
° FAQ / USEFUL INFO °
• Duration?
- A run may last from 2h30 to 3h30
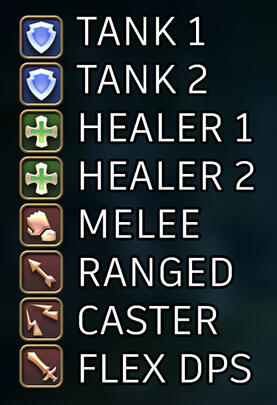
• Alliance composition?
- 6 teams: A, B, C, D, E & F
- Standard team composition: 2 tanks, 2 healers, 1 melee, 1 ranged, 1 caster & 1 FLEX (any) DPS


• How does raise work?
Normal raising methods do not work in DRS, but there are a few special ways to get raised:
- Resistance Reraiser = 70% chance upon K.O.
- Lost Arise with Pure Essence of the Divine = approx 10% chance per cast
- Lost Sacrifice with Pure Essence of the Indomitable = 100% chance but user may get "Doom" debuff
- Healer LB3 = 100% chance


• Thrice / Twice-Come Ruin?
- Getting hit by an avoidable mechanic = 1 stack of Thrice / Twice-Come Ruin debuff
- Up until Bozjan Phantom, 3 mistakes = Death
- Bozjan Phantom and onwards, 2 mistakes = Death

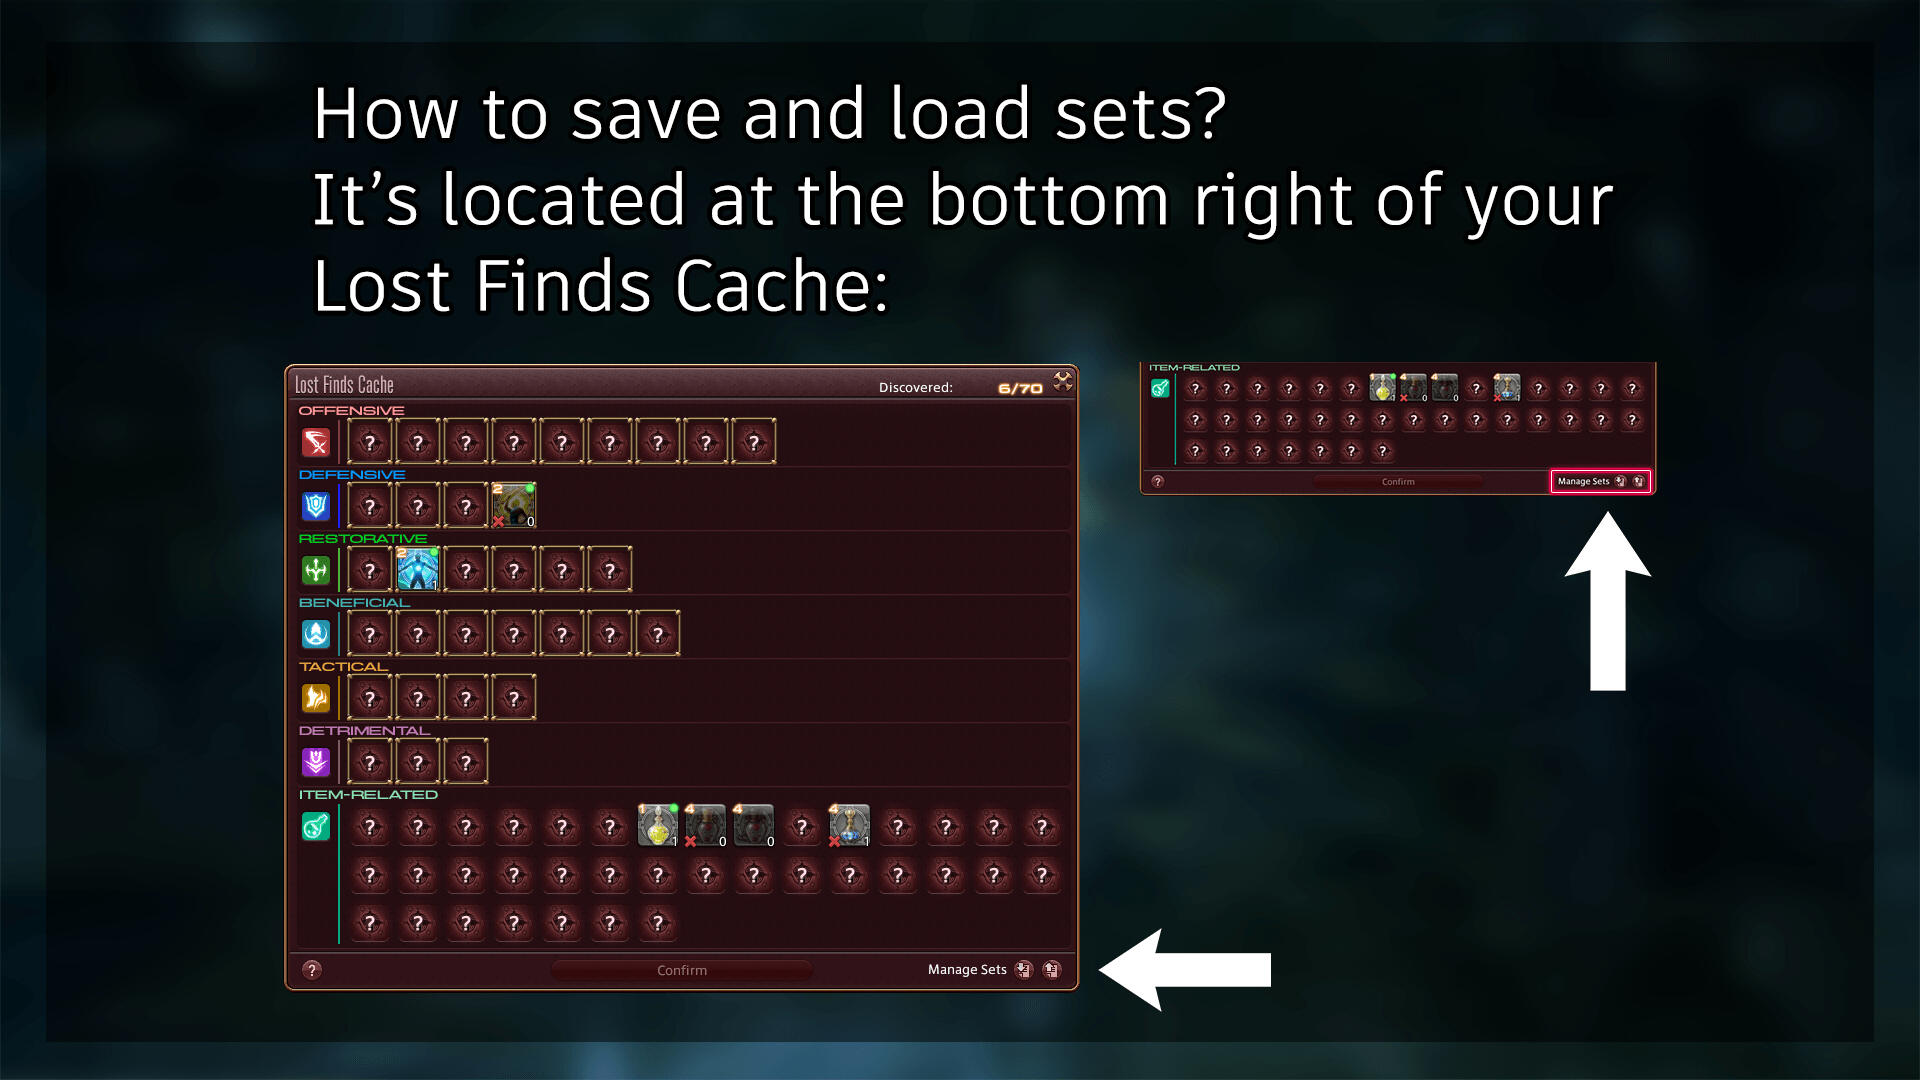
• Lost Finds Cache?
A Lost Finds Cache is at the entrance, but you cannot use /return or Lodestone
Therefore, once you jump past the entrance, your holster is set and final for the whole duration of the raid

• Positionals?
There are no positionals in Bozja content. Don't try to do them!

• Objects on hotbars?
Objects can be dragged from your holster on your hotbars. Use this to make your life easier! Be careful: some objects also share the same cooldowns
• Entrance clip:
• Objects in Bozja clip:

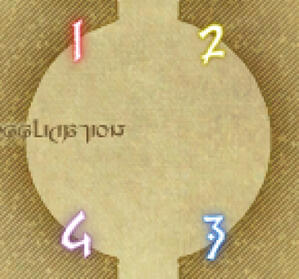
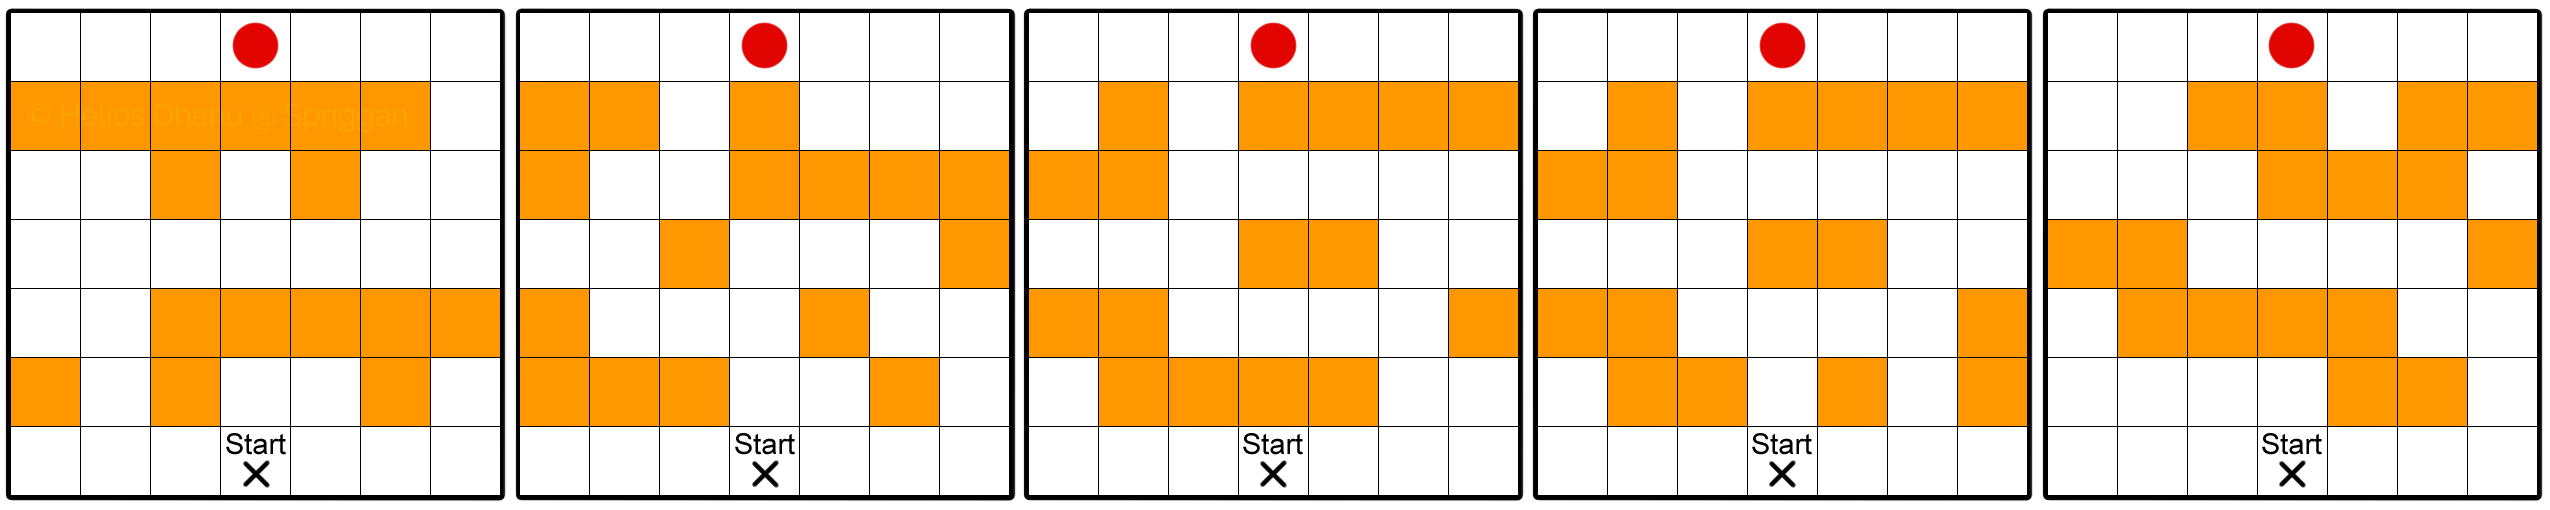
° Slimes (A/B/C PARTY) °

• Important:
- Alliance is cut in half: only 24 players (A, B & C) do Slimes
- Never stay mid
- No AoEs (esp. Assizes & Dances)
- Markers at entrance are used for pre-positionning
- No use of offensive lost actions
Click on the image to enlarge it!

• Traps:
- 2 in random rooms, 1 in mid corridor
- Ranged players reveal them by using Lost Perception
- After being revealed, traps are still dangerous• Slimes goals:
- Avoid red slimes fusing with other slimes (can interrupt Fusion cast)
- A big green slime must explode on every green pad within a 15 seconds interval
- Run to the ending safe spot once all big green slimes cast "Rupture"


• Green Slimes (Viscous Clot):
- Wave of 3 slimes appear mid periodically
- Become bigger & gain beneficial effect stacks by fusing with other green slimes
- At 5 stacks, rupture & activate their green pad
- Begin at 2 stacks, need 3 more (1 stack = 1 green slime)
• Tanks:
- 4 tanks pick up 1 wave of green slimes and bring it to a room
- 1 tank in each room keeps one big slime on their green pad
• Healers:
- Pull a green slime for their tank twice, then a 3rd last green slime
WAIT for Raid Leader "GO" before making 3rd green fuse with big


• Red Slimes (Sanguine Clot):
- Wave of 1 by 1 in each room (4 total per wave)
- Tether to the first person attacking them
- Are deadly if fused with any other slime
• DPS:
- Stay in the room you have been assigned to, and kill all the red slimes which appear inside (your marker = your room)
• Slimes video:


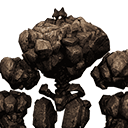
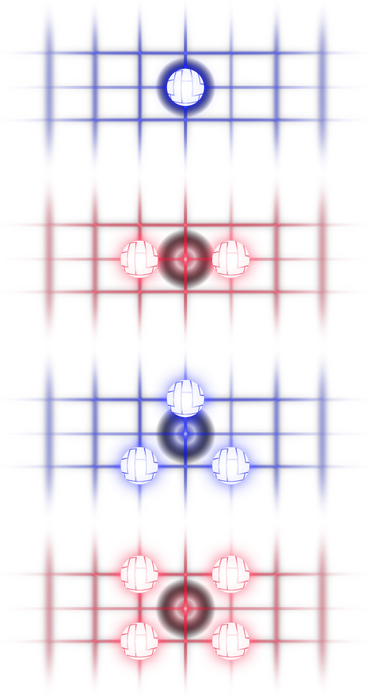
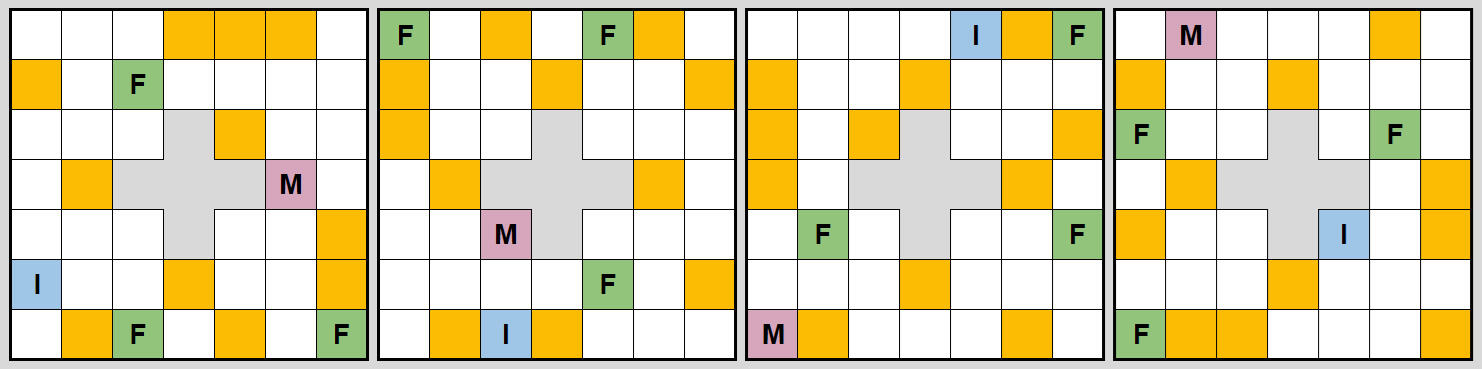
° Golems (party D/E/F) °

Click on the image to enlarge it!
• Important:
- Alliance is cut in half: only 24 players (D, E & F) do Golems
- Golems at entrance are used for pre-positioning
- Bicolor golems use "Metamorphosis" cast to change color
- Our preferred kill order is: Blue > Green > Red > White
(While tanks, healers and ranged DPS from the parties are assigned to specific rooms, golems will be killed in order by all the remaining DPS)
- No use of offensive lost actions


• Traps:
- 2 in random rooms, 1 in mid corridor
- Ranged players reveal them by using Lost Perception
- After being revealed, traps are still dangerous• Golems goals:
- Kill each bicolor golem on their corresponding colored pad
- Wait for a call from slimes before killing last golem & deal with soft enrage
- Stun temporarily stops golems Demolish cast during soft enrage
• Blue & Green golem: Every "Metamorphosis" cast must be interrupted


Blue golem:
- Tanked in E1 // SW // Blue pad. Killed 1st
- Uses a purple AoE tank buster which inflicts a deadly dot
- Healers need to "Esuna" this dot ASAP
Green golem:
- Tanked in D2 // NE // Green pad. Killed 2nd
- Can eat nearby ruins golems, gaining a damage buff in the process
(Use cooldowns and / or invuln if this happens!)
• White & Red golem: - Let 1 Metamorphosis cast go through for those golems to turn the correct colour, then interrupt every Metamorphosis cast

Red golem:
- Tanked in D1 // NW // Red pad. Killed 3rd
- Is green first. Can eat ruins golems while green
- Once red, tethers to the first player doing any damage to it
This includes DOTs and autos! Wait for tank to get aggro
- Its autos are deadly, so the ranged assigned to it will interrupt its metamorphosis
Use invuln to kill it safely on its pad when its health is low enough
White golem:
- Tanked in E2 // SE // White pad. Killed 4th (last)
- Is blue first. Uses the same tank buster while blue
- Once white, uses a self-benediction at 30% remaining health. Wait for Slimes "GO" before making it reach this health threshold
Kill it before it finishes its cast
• Golems video:


° Trinity Seeker °
• Important:
- Try to always stay close to the boss
- Mechanics listed may overlap together at different points of the fight
- After this fight, 6 traps await. Don't rush!
• Phantom Edge
- Trinity Seeker's swords glow, changing his next attack• Tank Busters
- Red marker on tank, no cast = Regular TB
- Baleful Onslaught = Invuln / Shareable (duo) TB
- Baleful Onslaught with Phantom Edge = Solo TB• Baleful Blade
- Regular = Deadly AoE. Go behind the barriers
- With Phantom Edge = Knock back. Go in front of the barriers• Baleful Firestorm AKA "Ravana Dashes"
- Be mid: 4 clones teleport 1 by 1 at the edges of the arena, doing a circle AoE in the process; then dash forward, much like Ravana / Ifrit dashes• Burning Chains
- Random players get marked with chains above their heads
- If marked: group up, then spread out (distance-based chains)
• Ravana dashes + Barriers clip:
• Barriers + Chains clip:
• Verdant Path
- Stance change. Uses an AoE depending on which stance is adopted
- Red Aura / DRK = Sides AoE (in front or behind safe)
- Blue Aura / SAM = Cross-shaped AoE (intercardinals safe)
- Green Aura / MNK = Share AoE
Slashes are always followed by Seasons of Mercy
• Fourfold Mercy AKA "Slashes"
- Same as normal mode, but faster
- Casts First → Fourth Mercy then unleashes them all one after another

Calls here would be: front → front → back → back
• Clone's Fourfold Mercy AKA "Clone Slashes"
- Trinity Seeker uses a clone for his Fourfold Mercy. Cleaves will emit from it

Calls here would be: right → right → left → left
• Animated version (careful, slashes are actually faster than this!) :

Slashes

Clone Slashes


• Seasons of Mercy
- Faster than in normal mode
- Criss-cross ice AoE → Look away (petrify) orb → Criss-cross ice AoE → Growing pink AoE

• Iron Splitter
- Same as normal mode, but faster
- Trinity Seeker jumps to Sand or Tiles, and makes all the circles with the same element as the one under his feet explode (so all sand or all tiles circles)

Left: Tiles exploding // Right: Sand exploding
• Iron Splitter + Dead Iron
- Dead Iron targets 3 players with "Earth Shakers" shooting from mid
- Spread those away from the group while standing on Sand / Tiles

Highlighted in white = Boss // In turquoise = Clone
• Trinity Seeker video:
• Post fight traps clip:


° DAHU °
• Reverberating Roar AKA "AoE Puddles"
- Spawn sets of circle AoEs under random players' feet
• Hot Charge
- No cast, charges in front of him
• Firebreathe
- Conic AoE, can rotate clockwise or counter clockwise
• Left / Right Shockwave AKA "Slappies"
- Half-circle AoE on one side, immediately followed by the other side
• Head down
- Adds on the edges of the arena use line AoEs
• Crowned Marchosias adds
- Tethered to the Main Tank, gain damage buffs over time. Kill ASAP
• Spit Flame
- Random players get marked by numbers from 1 to 4. Go to the corresponding marker (1 to 1; 2 to 2; etc.)
• Hysteric Assault + Burn x2
- Flare tank buster on 2 random tanks
- If targeted, use cooldowns & get pushed North, away from the other tank
- Rest of the group get pushed South
• Dahu video:


° QUEEN'S GUARDS °
• Important:
- Guards can tether together and buff each other if too close
- ABC focus Knight & Soldier // DEF focus Warrior & Gunner
- Guards need to die at approximately the same time (if one dies, the other begins a long-cast raid-wide, which is fatal)
- This fight's mechanics will be re-used on the Queen
• Tank Busters
- Rapid Sever & Shot in the Dark
• Raid wides
- Blood and Bone & Queen's Shot
Click on the images to access the corresponding sections:

P1: Knight and Warrior

P2: Gunner and Soldier

P3: Wards


° P1: Knight and Warrior °
Click on the images to access the corresponding sections:
P1: Knight and Warrior

P2: Gunner and Soldier
P3: Wards

Knight & Warrior
• Fight begins with them tethering together to be resistant to a certain type of damage (magical or physical): depending on that tether, Spellforge OR Steelsting will be needed
What if I have the wrong buff? You can either click off your current Spellforge / Steelsting buff, or make a macro like the one below


PASTEBIN: link
• Spellforge clip (yellow tether) :
• Steelsting clip (purple tether) :
• Healers: Spellforge / Steelsting

Spellforge: Apply on all physical players from your party
Steelsting: Apply on all magical players from your party
Hybrid jobs? These jobs use both physical and magical attacks.
They will need the correct buff (will be called by RL) each time
Note: Remember to reapply the buff if a player dies!

• Boost
- Damage up buff on Warrior. Must be dispelled with “Lost Dispel”

• Reversal of Forces AKA "Debuff"
- Warrior tethers bombs and / or players, reversing their gravity. If players are targeted by this ability, they will have a visible debuff (left image)

• Shield OR Sword Omens + Above Board (Bombs)
- Shield: Knock back from center + AoE on the edge Knight is facing
- Sword: Go to the edges, AoE center
- Bombs: Players and bombs can both have their gravity reversed


• Shield Omen with Debuff clip:
• Sword Omen no Debuff clip:
• Winds of Weight AKA "Wind / Gravity Puddles"
- Debuff go to wind (green), no debuff go to gravity (purple)
Pop sprint & don't go far: You will need to go back middle real fast once that's done!
• Optimal Play (Shield OR Sword)
- Shield: 3 Claws, no Claw side = Safe [IN] (donut AoE)
- Sword: 3 Claws, no Claw side = Safe [OUT] (circle AoE)

⚠️ There is no melee uptime during Winds of Weight
• Wind / Gravity + Shield clip:
• Wind / Gravity + Sword clip:
• Queen's Guards Phase 1 clip:
Click on the images to access the corresponding sections:

P1: Knight and Warrior

P2: Gunner and Soldier
P3: Wards


° P2: Gunner and Soldier °
Click on the images to access the corresponding sections:

P1: Knight and Warrior

P2: Gunner and Soldier
P3: Wards


Gunner & Soldier
• Reading AKA "Open Spot"
- Gunner gives all players a "Unseen" debuff
- They will each have 1 random safe side, represented by the open spot on the circle around them
• Great Ball of Fire + Queen's Shot
- Great Ball of Fire: 4 fire orbs will turn into frogs & move around the arena, then explode
- Queen's Shot: Point your open spot towards the Gunner, then towards a turret on the side


• Icy & Fiery Portent AKA "Ice" & "Fire"
Icy Portent: Keep moving until the end of the cast (Freeze)
Fiery Portent: Stop moving until the end of the cast (Pyretic)
• Icy Portent clip:
• Fiery Portent clip:
• Gun Turret + Sniper Shot
- Gunner summons 2 gun turrets. They will use a tank buster called "Sniper Shot", which has to be taken by a tank & invuln'ed
⚠️ Gun turrets' aggro is enmity based
- Kill those turrets ASAP as they begin casting their Enrage ("Explosion") after this TB
The following mechanics may not be seen / are most commonly skipped nowadays:
• Double Gambit AKA "Jumping Clones"
- Same as normal mode: Soldier summons clones who jump around the arena then use a circle AoE if tethered
• Automatic turret
- Same as normal mode: Gunner will summon 4 turrets inside of the arena which will fire a line AoE
• Queen's Guards Phase 2 clip:
Click on the images to access the corresponding sections:

P1: Knight and Warrior

P2: Gunner and Soldier
P3: Wards


° P3: Wards °
Click on the images to access the corresponding sections:

P1: Knight and Warrior

P2: Gunner and Soldier
P3: Wards
Wards = DPS CHECK
• Coat of Arms AKA "Shields"
- All Guards will regularly shield themselves on two sides
- Attack them on their unshielded sides to avoid getting a Thrice-Come Ruin stack & being stunned + knocked back (like Ravana shields)
• Overview:
- 4 guards with wards to kill before Enrage cast is finished• Additionally, 2 waves of spheres will spawn on the arena:
- 12 Spiritual Spheres per wave- 2 Aura Spheres per wave
Parties ABC = NORTH Aura Sphere // Parties DEF = SOUTH Aura Sphere
This happens twice!Click on the images below to enlarge them:

Spheres: Overview


Spheres: What do I do?


• Aura Spheres + Spite Check
- They cast "Spite check" on their target
⚠️ Aura spheres' aggro is enmity based
- If not killed by the end of the "Spite Check" cast, will begin targetting random players with it
- When killed in time, "Spite Check" will be announced by a red marker above the targeted player's head: use your invuln when this happens

• Spiritual Spheres
- Uses a circle AoE twice then explode, giving all players a damage down debuff
- To be killed, players (usually healers) need to stand in their circle AoE with the buff "Lost Reflect", given by a Light Curtain
• Queen's Guards Phase 3 clip:
• Queen's Guards full video:
Click on the images to access the corresponding sections:

P1: Knight and Warrior

P2: Gunner and Soldier
P3: Wards


° BOZJAN PHANTOM °

• Important:
- From now on, 2 mistakes will kill you
- After this fight, 6 traps await. Don't rush!

• Lost Banish III
- Damage taken by Bozjan Phantom +25%
- Refresh it so it's always up (60 secs duration)
• Malediction of Agony
- Raid Wide
• Weave & Manipulate Miasma
- Makes symbols appear North & detonates all the lower ones, followed by all the top ones
(Careful: line AoE pulses 3 times!)

Lower symbols detonate in different pulsing AoEs

Top symbols detonate in different pulsing AoEs
• Weave & Invert Miasma
- Makes symbols appear North & detonates all the top ones, followed by all the lower ones
The following mechanics may not be seen / are most commonly skipped nowadays:
• Summon (1st time) & Malediction of Ruin
- Summons 3 waves of 2 different types of adds:
Bloody (red) Wraith: Must be killed
Misty (white) Wraith: Must be healed to full
- Malediction of Ruin: Enrage cast which must be interrupted
• Summon (2nd time & onwards)
- Summons an add North or South. He will push the players from where he's standing
• Vile Wave
- Conic AoE
• Ice Spikes
- Buff hurting + slowing every player attacking. Must be dispelled with "Lost Dispel"
• Excruciation
- Tank buster
• Bozjan Phantom video:
• Post fight traps clip:


° Trinity Avowed °


• Important:
- Trinity Avowed raid wides hit hard and need extra mitigation
- Shell II is for tanks to apply before slotting in Lost Aethershield and use on anybody who wants / needs it
- Lost Aethershield is for tanks to use throughout the fight
Raid wide : "Glory of Bozja"

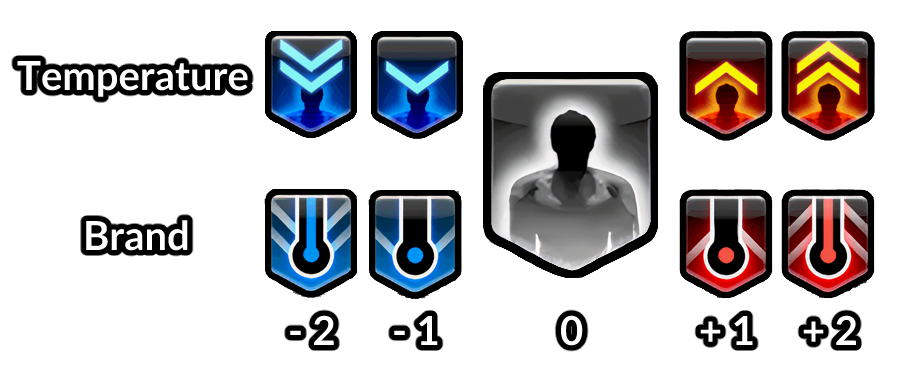
• Temperature?
- A “temperature” is a debuff inflicted on you, ranging from -2 to +2. It will apply at the end of the mechanic, and needs to be resolved by being neutral (0) before then

• Brand?
- A "brand" is a timed debuff inflicted on you, ranging from -2 to +2. It applies at the end of the timer. Unlike your temperature, your brand cannot be changed

• Brand & Temperature?
- Brand is always paired with temperature. There are 16 possible combinations: link
Note: Some combinations, such as +1 & +2 (resulting in a total +3), are only present in Sword as it is the only weapon allowing you to get hit twice
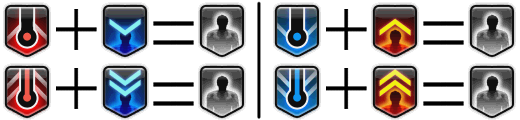
• How do I solve Brand, then?
To be neutral, you will need to change your temperature to be the opposite of your brand, hence making your temperature neutralize your brand. Therefore, you need to achieve one of these combinations to nullify your brand and survive:
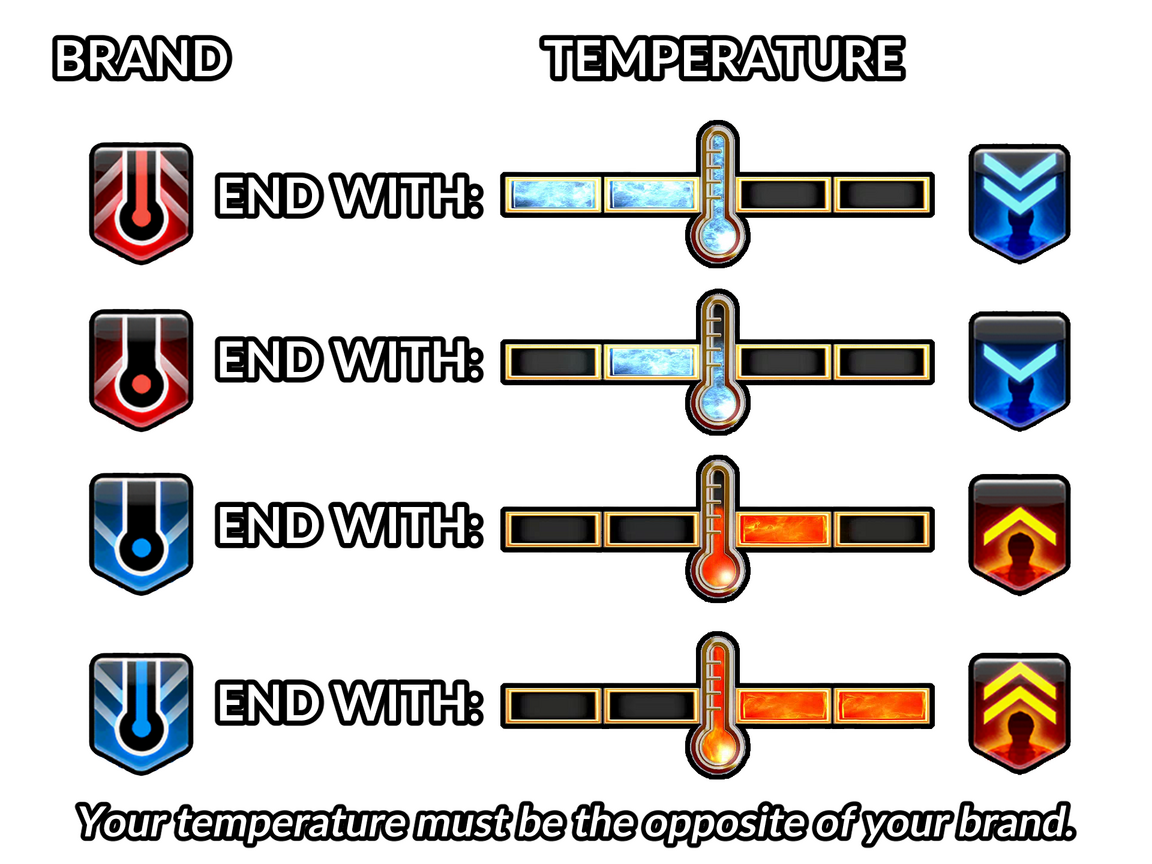
Brand only appears on the second rotation of each weapon!
• Tank Buster
- Wrath of Bozja: All tanks front as this is a trio shared tank buster
• Allegiant Arsenal
- Stance change. Uses an Aoe depending on which stance is adopted
- Staff / BLM = Circle AoE (away safe)
- Bow / BRD = 280° front AoE (behind safe)
- Sword / PLD = 280° behind AoE (front safe)
Trinity Avowed will use all stances once at the beginning of the fight to determine the order of her weapons' rotations• Each weapon has 2 rotations:
- 1st one = Temperature only
- 2nd one = Temperature + Brand
Each weapon rotation ends by a heavy raid wide: "Glory of Bozja"• The weapons' rotations will go as follow for the fight:
| Beginning of the fight (to determine order) | Rotation n°1 (temperature only) | Rotation n°2 (brand & temperature) |
|---|---|---|
| Allegiant Arsenal 1 | Allegiant Arsenal 3 | Allegiant Arsenal 3 |
| Allegiant Arsenal 2 | Allegiant Arsenal 1 | Allegiant Arsenal 1 |
| Allegiant Arsenal 3 | Allegiant Arsenal 2 | Allegiant Arsenal 2 |
Example given: Staff → Bow → Sword = Sword 1 → Staff 1 → Bow 1 → Sword 2 → Staff 2 → Bow 2
Staff

1st rotation: Quick March
- 4 proximity AoEs on intercardinals: be mid. Each AoE will spawn a meteor with a different temperature (from -2 to +2)
- Quick March debuff: you will walk 2 squares towards a random direction indicated by your debuff
Use your quick march to get to the correct meteor to be neutral at the end of the mechanic

2nd rotation: Unseen Eye (Clones)
- Same as 1st iteration, except instead of Quick March, 6 clones will appear on the edges of the arena and use line AoEs. There will be 1 safe square per meteor
⚠️ There is no neutral spot during staff: therefore, do not raise anyone (they would die)
Bow

1st rotation: Quick March & Flames of Bozja
- Flames will appear either West or East, making the opposite side safe. Use your Quick March to get to the safe side, away from the flame wall
- Trinity Avowed shoots 4 temperature arrows, leaving 1 neutral field free, and starts a Ladder Game:
⚠️ Arrows' paths are not visible in Savage!
• How to trace arrows paths clip:


2nd rotation: Clones & Flames + Quick March
- 6 Clones appear & use line AoEs, and flames appear at West or East. Use sprint to get to the safe side after clones' AoEs are done
- Ladder Game n°2, this time with a random Quick March (Forced March = 2 squares)
- You'll have to use your Forced March to get to the arrow you need
Sword


• How to move safely during Sword clip:
1st & 2nd rotations: Clones + Blade of Entropy x2
- Summons 3 clones. Every Trinity Avowed iteration will turn and cleave the arena with swords of each different temperature. Get hit by the correct sword to be neutral at the end
- There will be 2 cleaves, so you have 2 chances. On sword 2, you may need to be hit twice
(For example: if you get a +2 temperature AND brand, resulting in a total +4)
- Careful, however: you don't want to get hit by 2 swords at once!

• How to find the safe spot? → Method 1 & Method 2
• Sword Simulator Mini-game
• Trinity Avowed video:
• Post fight traps clip:


° Stygimoloch Lord °
• Important:
- To get to the Stygimoloch Lord, a mini trap is needed
- If the Stygimoloch Lord isn't killed, the Queen is invincible
- The fight difficulty actually comes from its adds phase
• Tank Buster
- Foe Splitter, always followed by a knockback for all players (Surecast & Arms length work against it) & Whacks x3 (deadly conic AoEs to avoid)
• Raid Wide
- Thunderous Discharge
• 1111-tonze Swing
- Huge deadly circle AoE around boss
• Rapid bolts
- Persistent solo AoEs on 3 players. Drop them far away from the group then come back
• Crushing Hoof
- Proximity AoE baited on a random player

• Adds:
- Boss becomes untargetable and teleports middle, then spawns 4 mino adds
- 2 safe areas: Inner Circle & Outer Circle
- Purple = unsafe wall of death // Orange = traps possible spawns
- "Alcoves" are the safe indentations (notches / gaps) in the purple wall of death
Additional image (top view) for this phase: link
• Where do I go?
- TANKS & MELEE DPS in OUTER CIRCLE
- HEALERS in INNER CIRCLE
- RANGED & CASTER DPS in INNER //OR// OUTER CIRCLE (any is fine, the choice is yours)
This is purely an example of kiting: mino
tanks should not pop their own traps
• Mino Adds (1 wave of 4 adds)
- Their autos inflict a "Twice-Come Ruin" stack
- If too close to another mino (boss included), tether and gain movement speed
- Must be kited clockwise around the outer circle by designated tanks, starting from each cardinals / markers
- Once all 4 are dead, the purple wall of death will disappear and boss becomes targetable again
• Entrapment = Traps (1 wave of 4 traps)
- Each mino add will spawn 1 trap in its respective lane on outer circle
- Traps never spawn in front of markers: markers' alcoves are safe
- Designated "trapper" tanks will make them explode with their invuln
⚠️ Only markers are safe!
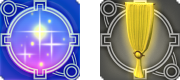
• Healer orbs (∞ waves of 2)

- Ball of Earth: has a shield buff which must be dispelled, then 1 attack / spell is enough to kill them

- Ball of Fire: same as Spiritual Spheres from Queen's Guards. Use a Light Curtain to reflect their circle AoE

• Labyrinthine Fate AKA "Debuff" + Fateful Words
- Wanderer's Fate: boss will push you, relative from middle
Go to an inner alcove
- Sacrifice's Fate: boss will pull you in, relative from middle
Go to an outer alcove

• Wanderer's Fate clip:
• Sacrifice's Fate clip:
• Devastating Bolt
- A lightning line will make only the alcoves of both rings safe
• Stygimoloch Lord video:


° The Queen °


• Important:
- The Queen is a repeat of Queen's Guards, plus a few more mechanics
- The Queen raid wides hit hard and need extra mitigation
- Shell II is for tanks to apply before the fight
- Lost Aethershield is for tanks to use throughout the fight
Raidwide cast names: "Empyrean Iniquity" & "Gods Save the Queen"


• Tank Busters
- Cleansing Slash: 2-hits TB which gives a Doom debuff (can be esuna'd) & Physical Vuln + Bleed; unless 0 dmg taken during the hit
- Several PLD & GNB tanks will take both hits of this TB, one after another in a predefined order
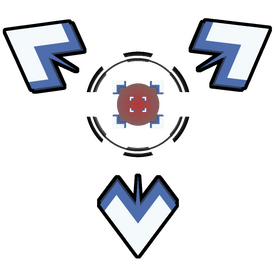
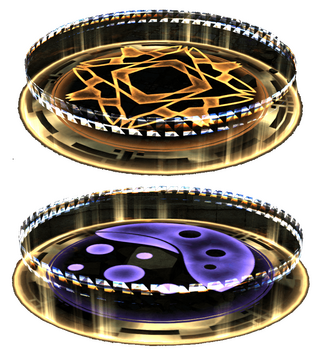
• Queen’s Will AKA "Easy Chess" or "Murder Chess"
- 3 orbs appear & form lines. 2 lines meet = circle AoE. Find the 2 parallel lines
- 4 guards appear & 2 by 2 of them will walk a number of squares indicated above their heads, then use a plus-shaped AoE. This is done in two steps, as guards will move 2 by 2:

Click on the image to enlarge it!
• Queen's Edict + Gunnhildr's Blade AKA "Super Chess"
- 4 Guards appear & 2 by 2 will walk a number of squares indicated above their heads, then use a rectangular-shaped AoE across the playable arena
- Queen teleports mid and becomes untargetable
- She will give you 2 Forced Steps debuffs: 1st one = shortest // 2nd one = longest

- These debuffs will resolve SEPARATELY as they both have different timers
- This mechanic ends with the Queen cleaving all the arena with a deadly AoE except the 1 safe blue square, located either North or South

• Sovereignty & Maelstrom’s Bolt
- Queen buffs herself with 4 buffs. Use "Lost Dispel" for each of them
- Meanwhile, lightning orbs will appear on the arena
- Like Spiritual Spheres / Balls of Fire, you'll need to reflect them
- Once killed, will make a protective dome appear
• Relentless Plays n°1 to n°4
- The Queen summons 2 of her Guards' and combines her forces with theirs:
1. Warrior + Gunner
- Parallel lines → (Debuff →) Wind / Gravity puddles → Open spot to Gunner → to turret

2. Knight + Soldier
- Knock back from center with Queen slash (3 different patterns)

- Tethered clones' AoEs with Queen slash (3 different patterns)

3. Knight + Gunner
- Knight position Bait → Shield / Sword claws' AoE → Turrets' lines AoE → Lightning orbs

⚠️ The image example is Shield omen, but Sword omen is also a possibility (like on the second video linked on the left)

4. Warrior + Soldier
- Knock back from blue line (2 squares) → (Debuff →) Freeze / Pyretic → Bombs


• Soft Enrage
Queen summons all Guards. They will use several heavy raid wides one after the other + Queen will use Empyrean Iniquity. This lasts 30 seconds.
- Use Aethershield one after the other at beginning of soft enrage (Guards AoEs) & at Empyrean Iniquity (required from both tanks)
- Healers heal ONLY! No damage, focus on keeping everyone alive
• The Queen video:
Congratulations!
You’ve cleared Delubrum Reginae: Savage. Or at least, its guide… Once you do clear, find your Cerberus mount in your achievements: “Battle” → “Field Operations” tab
PS: Don’t be afraid if you’re still on the floor when the Queen dies! Everyone in the arena gets the achievement ✨


° 1. WALL STRAT °
Click on the images to access the corresponding sections:

1. Wall Strat

2. Reverse Path

3. Valith

Back to the Queen


1. 'Wall strat' METHOD:
- This method will be the one called by the Raid Leader, who will tell you where to go
- Always point your camera toward the "blue" safe tile, treat this as your new north
- If you have a 5 or a 7, you'll always begin on a black tile
- If you have a 6, you'll always begin on a white tile• Images to help with Super Chess 'Wall Strat': link
Click on the images to access the corresponding sections:

1. Wall Strat

2. Reverse Path

3. Valith
Back to the Queen


° 2. Reverse path °
Click on the images to access the corresponding sections:

1. Wall Strat

2. Reverse Path

3. Valith
Back to the Queen
2. 'Reverse Path' METHOD:
⚠️ Savage Slimes won't call this method. It is given here as an example, in the scenario where its logic would be easier to understand for some
Click on the images to access the corresponding sections:

1. Wall Strat

2. Reverse Path

3. Valith
Back to the Queen


° 3. Valith °
Click on the images to access the corresponding sections:

1. Wall Strat

2. Reverse Path

3. Valith
Back to the Queen

3. 'Valith' METHOD:
⚠️ Savage Slimes won't call this method. It is given here as an example, in the scenario where its logic would be easier to understand for some
Click on the images to access the corresponding sections:

1. Wall Strat

2. Reverse Path

3. Valith
Back to the Queen


° Stygimoloch Warrior (1v1) °
• How do I get picked for duel?
On the signup form for your application, simply inform you want to try out duel• Conditions to sign up as duelist:
- Have cleared DRS
- Be comfortable with the raid's mechanics
- DPS role
• Required actions:

Recommended: 2x Resistance Potion kits + DPS rays / actions

• Important:
- Only 1 player can take the golden pad to the duel area
- If Dahu is pulled before the duelist jumps on the golden pad, it deactivates
- After clearing the duel, you will need to interact with a statue to be rewarded with the “Pride of the Lioness” buff
• Traps:
- 1 in front of each pad (directly upon arriving + upon leaving)
- 1 explosion & 1 poison for 2 total

• Surge of Vigor
- Damage up buff. Must be dispelled with “Lost Dispel”

• Unrelenting Charge
- Stygimoloch Warrior charges at you 3 times, knocking you back with each hit. Use an anti-knockback ability to avoid hitting the wall
• Entrapment + Lethal Blow
- Stygimoloch Warrior jumps North and knocks you back all the way South. Additionally, Stygimoloch Warrior places a traps labyrinth all over the arena
5 different patterns
• Inescapable Entrapment + Surging Flames OR Withering Curse → Devour
- Stygimoloch Warrior jumps to the middle and places traps all across the arena except in a small cross shape in the center
4 different patterns | F = Frog ; M = Mini ; I = Ice
Tip: Start by using Perception from the south part of the "Plus" (+)
- If you only reveal Mini: Ice is SW
- If you only reveal Ice: Mini is NW
- If you reveal neither: Ice is NE, Mini is SW
• 2 possibilities:
- Surging Flames: Fire AoE → Get hit by Ice trap
- Withering Curse → Devour: Pull then front cone AoE → Get hit by Mini trap
• After the 2nd trap mechanic:
- Surging Flood: Water AoE → Get hit by Frog trap
- Leaping Spark: Lightning AoE → Get hit by Frog trap a 2nd time to turn back human
Careful: After all Entrapments, explosion traps automatically explode when the mechanic resolves!
• Lethal Blow
- Stygimoloch Warrior cleaves the whole arena in front of him
• Forceful Strike
- A diagonal cleave across the arena from the corner where he is standing
• Vicious Swipe + Crazed Rampage
- Circular AoE followed by a knock back
• Focused Tremor
- Square AoEs exploding in the order they appeared
• Flailing Strike
- Conic AoE baited by the player then rotating counter clockwise
- Paired with Focused Tremor

• Coerce
Random Quick March debuff
Paired with Focused Tremor + Forceful Strike
• Stygimoloch Warrior video + timeline :

